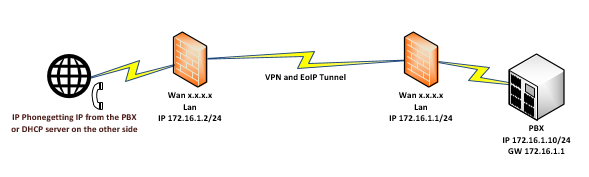
EoIP is a tunnel protocol designed to allows network easily connect private LANs located in different geographic location.
IP phones are great example where you can use EoIP to get simpel config and secure phone lines from phone to PBX.
a other good use of EoIP are when you need to move IT resources such as servers or other hardware that can not be moved in one fell swoop. When EoIP tunnel is up you can move client PC's and get IP from DHCP server on other side of your EoIP tunnel and still use all resources on other side.
K-Blogg, Showing tips and tricks! and discuss solutions to problems, As I have encountered during my years in the IT industry.
Monday, March 2, 2015
Monday, February 23, 2015
Considerations when selecting your hypervisor
What does a hypervisor do?
A hypervisor is one of two main ways to virtualize a computing environment. By ‘virtualize’, we mean to divide the resources (CPU, RAM etc.) of the physical computing environment (known as a host) into several smaller independent ‘virtual machines’ known as guests. Each guest can run its own operating system, to which it appears the virtual machine has its own CPU and RAM, i.e. it appears as if it has its own physical machine even though it does not. To do this efficiently, it requires support from the underlying processor (a feature called VT-x on Intel, and AMD-V on AMD). One of the key functions a hypervisor provides is isolation, meaning that a guest cannot affect the operation of the host or any other guest, even if it crashes. As such, the hypervisor must carefully emulate the hardware of a physical machine, and (except under carefully controlled circumstances), prevent access by a guest to the real hardware. How the hypervisor does this is a key determinant of virtual machine performance. But because emulating real hardware can be slow, hypervisors often provide special drivers, so called ‘paravirtualized drivers’ or ‘PV drivers’, such that virtual disks and network cards can be represented to the guest as if they were a new piece of hardware, using an interface optimized for the hypervisor. These PV drivers are operating system and (often) hypervisor specific. Use of PV drivers can speed up performance by an order of magnitude, and are also a key determinant to performance.Type 1 and Type 2 hypervisors – appearances can be deceptive
TYPE 1 native (bare metal)A Type 1 hypervisor (sometimes called a ‘Bare Metal’ hypervisor) runs directly on top of the physical hardware. Each guest operating system runs atop the hypervisor. Xen is perhaps the canonical example. One or more guests may be designated as special in some way (in Xen this is called ‘dom-0’) and afforded privileged control over the hypervisor.
TYPE 2 (hosted)
A Type 2 hypervisor (sometimes called a ‘Hosted’ hypervisor) runs inside an operating system which in turn runs on the physical hardware. Each guest operating system then runs atop the hypervisor. Desktop virtualization systems often work in this manner. A common perception is that Type 1 hypervisors will perform better than Type 2 hypervisors because a Type 1 hypervisor avoids the overhead of the host operating system when accessing physical resources. This is too simplistic an analysis. For instance, at first glance, KVM is launched as a process on a host Linux operating system, so appears to be a Type 2 hypervisor. In fact, the process launched merely gives access to a limited number of resources through the host operating system, and most performance sensitive tasks are performed by a kernel module which has direct access to the hardware. Hyper-V is often thought of as a Type 2 hypervisor because of its management through the Windows GUI; however, in reality, a hypervisor layer is loaded beneath the host operating system. Another wrinkle is that the term ‘bare metal’ (often used to signify a Type 1 hypervisor) is often used to refer to a hypervisor that loads (with or without a small embedded host operating system, and whether or not technically a Type 1 hypervisor) without installation on an existing platform, rather like an appliance. VMware describes ESXi as a ‘bare metal’ hypervisor in this context.
Hypervisors versus Containers
It is mentioned that a hypervisor was one of two main ways to segment a physical machine into multiple virtual machines; the other significant method is to use containers. A hypervisor segments the hardware by allowing multiple guest operating systems to run on top of it. In a container system, the host operating is itself divided into multiple containers, each running a virtual machine. Each virtual machine thus not only shares a single type of operating system, but also a single instance of an operating system (or at least a single instance of a kernel).Virtualization using containers
Virtualization using hypervisors
Containers have the advantage of providing lower overhead (and thus increased virtual machine density), and are often more efficient particularly in high I/O environments. However, they restrict guest operating systems to those run by the host (it is not possible, for instance, to run Windows inside a container on a Linux operating system), and the isolation between virtual machines is in general poorer. Further, if a guest manages to crash its operating system (for instance due to a bug in the Linux kernel), this can affect the entire host, because the operating system is shared between all guests.
Considerations when selecting a hypervisor
Clearly from the above, the performance and maturity of the hypervisor are going to be important considerations.Four hypervisors under review
KVM is a Linux based open source hypervisor. First introduced into the Linux kernel in February 2007, it is now a mature hypervisor and is probably the most widely deployed open source hypervisor in an open source environment. KVM is used in products such as Redhat Enterprise Virtualization (RHEV).
Xen is an open source hypervisor which originated in a 2003 Cambridge University research project. It runs on Linux (though being a Type 1 hypervisor, more properly one might say that its dom0 host runs on Linux, which in turn runs on Xen). It was originally supported by XenSource Inc, which was acquired by Citrix Inc in 2007.
VMware is (as previously trailed) not a hypervisor, but the name of a company, VMware Inc. VMware’s hypervisor is very mature and extremely stable. It is a trusted brand that delivers excellent performance in terms of running servers, though on most loads the difference between VMware and other hypervisors is not huge. The performance (for instance time to create or start a server), however, is in general worse than either KVM or Xen.
Hyper-V is a commercial hypervisor provided by Microsoft. Whilst excellent for running Windows, being a hypervisor it will run any operating system supported by the hardware platform.
As a commercial hypervisor, the licensee must bear the cost of licensing Hyper-V itself. However, many licensees with Windows SPLA licenses see this as included within the organizations Windows licensing costs. Further, Microsoft offers preferential pricing on guest operating systems running inside Hyper-V, which in some cases may offset this cost.
Summary
Best hypervisor for you will depend on your circumstances. Typically we find traditional hosting providers and those cloud service providers that are particularly sensitive to cost or density prefer the open source hypervisors (KVM or Xen), with KVM being the most popular. Managed service providers whose customers are sensitive to branding considerations or require the enterprise style storage integration of VMware prefer that as a hypervisor. Recently we have seen Windows focused providers use Hyper-V, normally on a subset of clusters within a multi-cluster deployment.Friday, January 2, 2015
NTP solution with vrrp to secure time sync for 800 vm
How to get 800 vm and infrastructure to sync the time in a safe manner. When you see the customer only has one poor NTP server that can not meet all of the time sync requests. And for sure if this one fails every thing will fails. No problem you thingking we just get one more NTP server,
then you begin to realize what a job this would be to config 800 vm and infrastructure to sync on
secondary NTP server. No problem you solve this with two routers, two NTP servers and a vrrp.
Now you have a failover and don't need to reconfigure 800 vm and infrastructure for NTP sync.
You need to use routers that can be NTP servers. Now you sync your servers and infrastructure against one of the active Routers in the VRRP.
then you begin to realize what a job this would be to config 800 vm and infrastructure to sync on
secondary NTP server. No problem you solve this with two routers, two NTP servers and a vrrp.
Now you have a failover and don't need to reconfigure 800 vm and infrastructure for NTP sync.
You need to use routers that can be NTP servers. Now you sync your servers and infrastructure against one of the active Routers in the VRRP.
Thursday, January 1, 2015
EoIP or Ether over IP
EoIP or Ether over IP tunnel is a tunnel protocol designed by Mikrotik which allows network administrators to easily connect private LANs located in different geographic location. As long as the Mikrotik routers can ping each other, we can create the EoIP tunnel among them. EoIP can be used with VPN but I will show a very simpel EoIP tunnel setup in this exampel.
R1:
Public IP: 50.60.50.58/29 (assigned to ether1)
Default Gateway: 50.60.50.57
LAN IP: 192.168.100.0/24
EoIP tunnel IP: 10.10.10.1/30 (assigned to EoIP_R1)
R2:
Public IP: 60.50.60.50/29 (assigned to ether1)
Default Gateway: 60.50.60.49
LAN IP: 192.168.101.0/24
EoIP tunnel IP: 10.10.10.2/30 (assigned to EoIP R2)
I assume that you have configured the internal LAN so it can connect to internet (masquerade the private IPs to the public interface).
Configuration on for R1 and R2:
R1:
/ip address add address=50.60.50.58/29 interface=ether1
/ip route add dst-address=0.0.0.0/0 gateway=50.60.50.57
/ip firewall nat add action=masquerade chain=srcnat out-interface=ether1 src-address=192.168.100.0/24
/interface eoip add name=EoIP_R1 remote-address=60.50.60.50 tunnel-id=10
/ip address add address=10.10.10.1/30 interface=EoIP_R1
/ip route add dst-address=192.168.101.0/24 gateway=10.10.10.2
R2:
/ip address add address=60.50.60.50/29 interface=ether1
/ip route add dst-address=0.0.0.0/0 gateway=60.50.60.49
/ip firewall nat add action=masquerade chain=srcnat out-interface=ether1 src-address=192.168.101.0/24
/interface eoip add name=EoIP_R2 remote-address=50.60.50.58 tunnel-id=10
/ip address add address=10.10.10.2/30 interface=eoip1
/ip route add dst-address=192.168.100.0/24 gateway=10.10.10.1
After you finish the above configuration, you should be able to ping from PC1 to PC2 / PC2 to PC1
Public IP: 50.60.50.58/29 (assigned to ether1)
Default Gateway: 50.60.50.57
LAN IP: 192.168.100.0/24
EoIP tunnel IP: 10.10.10.1/30 (assigned to EoIP_R1)
R2:
Public IP: 60.50.60.50/29 (assigned to ether1)
Default Gateway: 60.50.60.49
LAN IP: 192.168.101.0/24
EoIP tunnel IP: 10.10.10.2/30 (assigned to EoIP R2)
I assume that you have configured the internal LAN so it can connect to internet (masquerade the private IPs to the public interface).
Configuration on for R1 and R2:
R1:
/ip address add address=50.60.50.58/29 interface=ether1
/ip route add dst-address=0.0.0.0/0 gateway=50.60.50.57
/ip firewall nat add action=masquerade chain=srcnat out-interface=ether1 src-address=192.168.100.0/24
/interface eoip add name=EoIP_R1 remote-address=60.50.60.50 tunnel-id=10
/ip address add address=10.10.10.1/30 interface=EoIP_R1
/ip route add dst-address=192.168.101.0/24 gateway=10.10.10.2
R2:
/ip address add address=60.50.60.50/29 interface=ether1
/ip route add dst-address=0.0.0.0/0 gateway=60.50.60.49
/ip firewall nat add action=masquerade chain=srcnat out-interface=ether1 src-address=192.168.101.0/24
/interface eoip add name=EoIP_R2 remote-address=50.60.50.58 tunnel-id=10
/ip address add address=10.10.10.2/30 interface=eoip1
/ip route add dst-address=192.168.100.0/24 gateway=10.10.10.1
After you finish the above configuration, you should be able to ping from PC1 to PC2 / PC2 to PC1
Sunday, October 26, 2014
Tools That Could Be Handy To Have
Tftpd32:
Tftpd32 is a free, opensource IPv6 ready application which includes DHCP, TFTP, DNS, SNTP and Syslog servers as well as a TFTP client. The TFTP client and server are fully compatible with TFTP option support (tsize, blocksize and timeout), which allow the maximum performance when transferring the data.
Here you can find Tftpd32:
http://tftpd32.jounin.net/
WinSCP:
It is award-winning SFTP client, SCP client, FTPS client and FTP client integrated into one software program for file transfer to FTP server or secure SFTP server.
Here you can find WinSCP:
http://winscp.net/
PuTTY:
PuTTY is an SSH and telnet client, developed originally by Simon Tatham for the Windows platform. PuTTY is open source software that is available with source code and is developed and supported by a group of volunteers.
Here you can find PuTTY:
http://www.putty.org/
Rufus:
Rufus is a utility that helps format and create bootable USB flash drives, such as USB keys/pendrives, memory sticks
Here you can find Rufus:
http://rufus.akeo.ie/
ImgBurn:
ImgBurn is a lightweight CD / DVD / HD DVD / Blu-ray burning application that everyone should have in their toolkit!
Here you can find ImgBurn:
http://www.imgburn.com/
Subnet Calc:
The SolarWinds Free Advanced Subnet Calculator is completely free and fully functional. In fact, it actually delivers four tools in one
Response Time Viewer for Wireshark:
Quickly analyze Wireshark packet capture file to troubleshoot performance issues
Here you can find SubnetCalc/Response Time Viewer for Wireshark:
http://www.solarwinds.net/
Wireshark:
Wireshark is the world's foremost network protocol analyzer. It lets you see what's happening on your network at a microscopic level. It is the de facto (and often de jure) standard across many industries and educational institutions.
Here you can find Wireshark:
https://www.wireshark.org/
Tftpd32 is a free, opensource IPv6 ready application which includes DHCP, TFTP, DNS, SNTP and Syslog servers as well as a TFTP client. The TFTP client and server are fully compatible with TFTP option support (tsize, blocksize and timeout), which allow the maximum performance when transferring the data.
Here you can find Tftpd32:
http://tftpd32.jounin.net/
WinSCP:
It is award-winning SFTP client, SCP client, FTPS client and FTP client integrated into one software program for file transfer to FTP server or secure SFTP server.
Here you can find WinSCP:
http://winscp.net/
PuTTY:
PuTTY is an SSH and telnet client, developed originally by Simon Tatham for the Windows platform. PuTTY is open source software that is available with source code and is developed and supported by a group of volunteers.
Here you can find PuTTY:
http://www.putty.org/
Rufus:
Rufus is a utility that helps format and create bootable USB flash drives, such as USB keys/pendrives, memory sticks
Here you can find Rufus:
http://rufus.akeo.ie/
ImgBurn:
ImgBurn is a lightweight CD / DVD / HD DVD / Blu-ray burning application that everyone should have in their toolkit!
Here you can find ImgBurn:
http://www.imgburn.com/
Subnet Calc:
The SolarWinds Free Advanced Subnet Calculator is completely free and fully functional. In fact, it actually delivers four tools in one
Response Time Viewer for Wireshark:
Quickly analyze Wireshark packet capture file to troubleshoot performance issues
Here you can find SubnetCalc/Response Time Viewer for Wireshark:
http://www.solarwinds.net/
Wireshark:
Wireshark is the world's foremost network protocol analyzer. It lets you see what's happening on your network at a microscopic level. It is the de facto (and often de jure) standard across many industries and educational institutions.
Here you can find Wireshark:
https://www.wireshark.org/
Friday, October 24, 2014
Atlas Probe from RIPE
As LIR I have chosen to get an Atlas Probe from RIPE. What is now an Atlas Probe? RIPE NCC is building the largest Internet
measurement network ever made. RIPE Atlas employs a global network of
probes that measure Internet connectivity and reachability, providing
an unprecedented understanding of the state of the Internet in real
time.
Here you can read more about Atlas Probe:
https://atlas.ripe.net/
You can reach my Atlas Probe here:
https://atlas.ripe.net/probes/17334/
Here you can read more about Atlas Probe:
https://atlas.ripe.net/
You can reach my Atlas Probe here:
https://atlas.ripe.net/probes/17334/
PXE Server on RouterOS
Ability to provision Operating Systems and boot iso over network are very useful I will show you one way with Mikrotik RouterOs as PXE Server. Any Mikrotik can become PXE server and are very handy. (Small form factor) We will use one Mikrotik with USB, because we will PXE boot bigger ISO images than Mikrotik can handle without USB. Sure you can use RouterOs for x86 and then you don't need USB only big internal HD for your ISO's. See www.mikrotik.com
Install and booting machines using RouterOS as bootp/tftp server is simple process if you done PXE booting before, for those that have not, allow me to provide a basic guide along with a package that's comes from this artikel See www.mikrotik-routeros.com/2013/02/routeros-as-a-pxe-net-boot-server/
I made some small changes from original artcle, booting bigger ISO's than 32Mb and use USB for PXE files.
What do we need:
Prepair USB:
System
Stores
Disks
Format Drive
Ready To Go:
boot up your hardware for PXE boot and select which images to boot from. If you have space on your router you can have many diffrent ISO's and you can easily fix boot screen to have multipla choices for your ISO files. (Files you need to edit are \tftp\pxelinux.cfg\default and \tftp\bootmsg.txt)
Install and booting machines using RouterOS as bootp/tftp server is simple process if you done PXE booting before, for those that have not, allow me to provide a basic guide along with a package that's comes from this artikel See www.mikrotik-routeros.com/2013/02/routeros-as-a-pxe-net-boot-server/
I made some small changes from original artcle, booting bigger ISO's than 32Mb and use USB for PXE files.
What do we need:
- Mikrotik any kind with USB
- USB or USB HD
- Mikrotik with working DHCP
Prepair USB:
System
Stores
Disks
Format Drive
Copy Files:
When drive is OK, go to Files and copy all files from package to router
( Package include mini.iso ubuntu) so if you want any other boot images you need to download any OS ISO and rename it to mini.iso and upload to router) I use CentOs 7 in my exampel.
Files
Fix Limit On 32Mb:
My ISO is CentOs 7 bigger than the limit on 32Mb as boot images. So you need to fix this with command Set "allow-rollover=yes" to let your router to handel bigger images than the limit.
Edit Variables:
#First copy the entire tftp directory to your MikroTik root or USB disk directory #Then edit these variables to suit your local network :global network "192.168.88.0/24" :global router "192.168.88.1" #Adding TFTP allowances for the provided range /ip tftp add ip-addresses="$network" real-filename=usb1/tftp/pxelinux.0 req-filename=pxelinux.0 add ip-addresses="$network" real-filename=usb1/tftp/bootmsg.txt req-filename=bootmsg.txt add ip-addresses="$network" real-filename=usb1/tftp/memdisk req-filename=memdisk add ip-addresses="$network" real-filename=usb1/tftp/pxelinux.cfg/default req-filename=pxelinux.cfg/default add ip-addresses="$network" real-filename=usb1/tftp/mini.iso req-filename=mini.iso
DHCP Settings For PXE:
#We assume there is an existing DHCP server setup, so just modifying the network config
/ip dhcp-server network
set [find address="$network"] boot-file-name=pxelinux.0 next-server="$router"
Or just use IP of router.
IP
DHCP Server
Networks
Ready To Go:
boot up your hardware for PXE boot and select which images to boot from. If you have space on your router you can have many diffrent ISO's and you can easily fix boot screen to have multipla choices for your ISO files. (Files you need to edit are \tftp\pxelinux.cfg\default and \tftp\bootmsg.txt)
Subscribe to:
Posts (Atom)